Verification of online content can be intimidating, but it is not difficult.
Being good at verification is mostly about repetition, persistence and using digital investigative tools with a little creativity. There are so many verification tricks and tools available now. In fact, the hardest part might be remembering all of the resources
at your disposal.
That’s where this book comes in. This is your condensed guide to the wizardry of verification. It includes essential concepts, checklists and our favorite tips and techniques. Most importantly, it will introduce you to the five pillars of verification, and hopefully serve as a quick reference for how to tackle each one.
Information travels quickly, and disinformation is becoming so easy to generate and spread that it is important for every journalist — not just the tech reporter and the social media editor — to understand basic verification skills.
This is especially true in a breaking news environment, when the pressure is high to both report quickly and get the facts straight. Newsrooms also need to protect themselves from being hoaxed and inadvertently introducing falsehoods to a wider audience. Many agents of disinformation see coverage by established news outlets as the end goal and will use online spaces to seed rumors and manipulated content, hoping to reach a bigger audience. For more information on this, see First Draft’s Essential Guide to Responsible Reporting in an Age of Information Disorder.
Don’t get duped. Learn to verify.
How to use this guide
Before you embark on any verification adventure, start by reading the first chapter, “Absolute Essentials.” These are the need-to-know concepts that could save you time — and potentially embarrassment.
The rest of the book is organized into five basic checks that you should do on any piece of content you wish to verify, whether it is eyewitness media, a manipulated video or a meme.
Of these chapters, “Provenance” is the most important, so pay extra attention to that one. Otherwise, feel free to flip through at your leisure, or go straight to a tip list that’s relevant for you.
Verification is a fluid process of finding new clues and corroborating evidence, and the progress you make on one check might help you with another.
Absolute essentials
Before verifying any content online, ask yourself this most basic question: Is the content I am looking at connected to an event that actually took place?
In some circumstances, such as a breaking news event, this question might be the very thing you are trying to ascertain with your verification. But in some cases it isn’t.
Imagine you find a video that claims to be of long lines and unhappy passengers at Chicago O’Hare International Airport. Before you go down the rabbit hole of verifying the person who captured the video, the date and time, or the location, your first question should be this one: Are there actually reports of problems at the airport?
Another example is the infamous headline that emerged ahead of the 2016 US election: Pope Endorses Donald Trump. You can do all the verification you like about the website, who created it, when the article was published and how far it spread, etc. but the fundamental claim of the article should be the first thing you check.
The 5 pillars of verification

The nice thing about teaching verification is that it is easy to break down. That’s because whether you are looking at an eyewitness video, a manipulated photo, a sock puppet account or a meme, the basic checks you have to do are the same:
- Provenance: Are you looking at the original account, article or piece of content?
- Source: Who created the account or article, or captured the original piece of content?
- Date: When was it created?
- Location: Where was the account established, website created or piece of content captured?
- Motivation: Why was the account established, website created or the piece of content captured?
The more you know about each pillar, the stronger your verification will be.
The elusiveness of certainty
Verification is hardly ever foolproof. It is more like looking for clues and collecting corroborating evidence. Picture an old-fashioned detective’s investigation board. Bits of information are pinned to the board: a location, a name, a telling quote. Lines between the clues present a web of connections. That’s what digital verification is: the same methods reporters and investigators have always used to get at the truth, but applied to the internet.
So go ahead and channel your inner Sherlock Holmes, collect as much evidence as you can, but realize that you will not always get a definitive answer. The fact that certainty eludes us means it is all the more important that we are forthright about what we know and what we don’t know—especially if that information is going to inform our reporting.
The following pages are two rubrics we built for verifying visual media — one for photo and one for video — that will help you gauge how airtight your verification is, and where the holes might be.
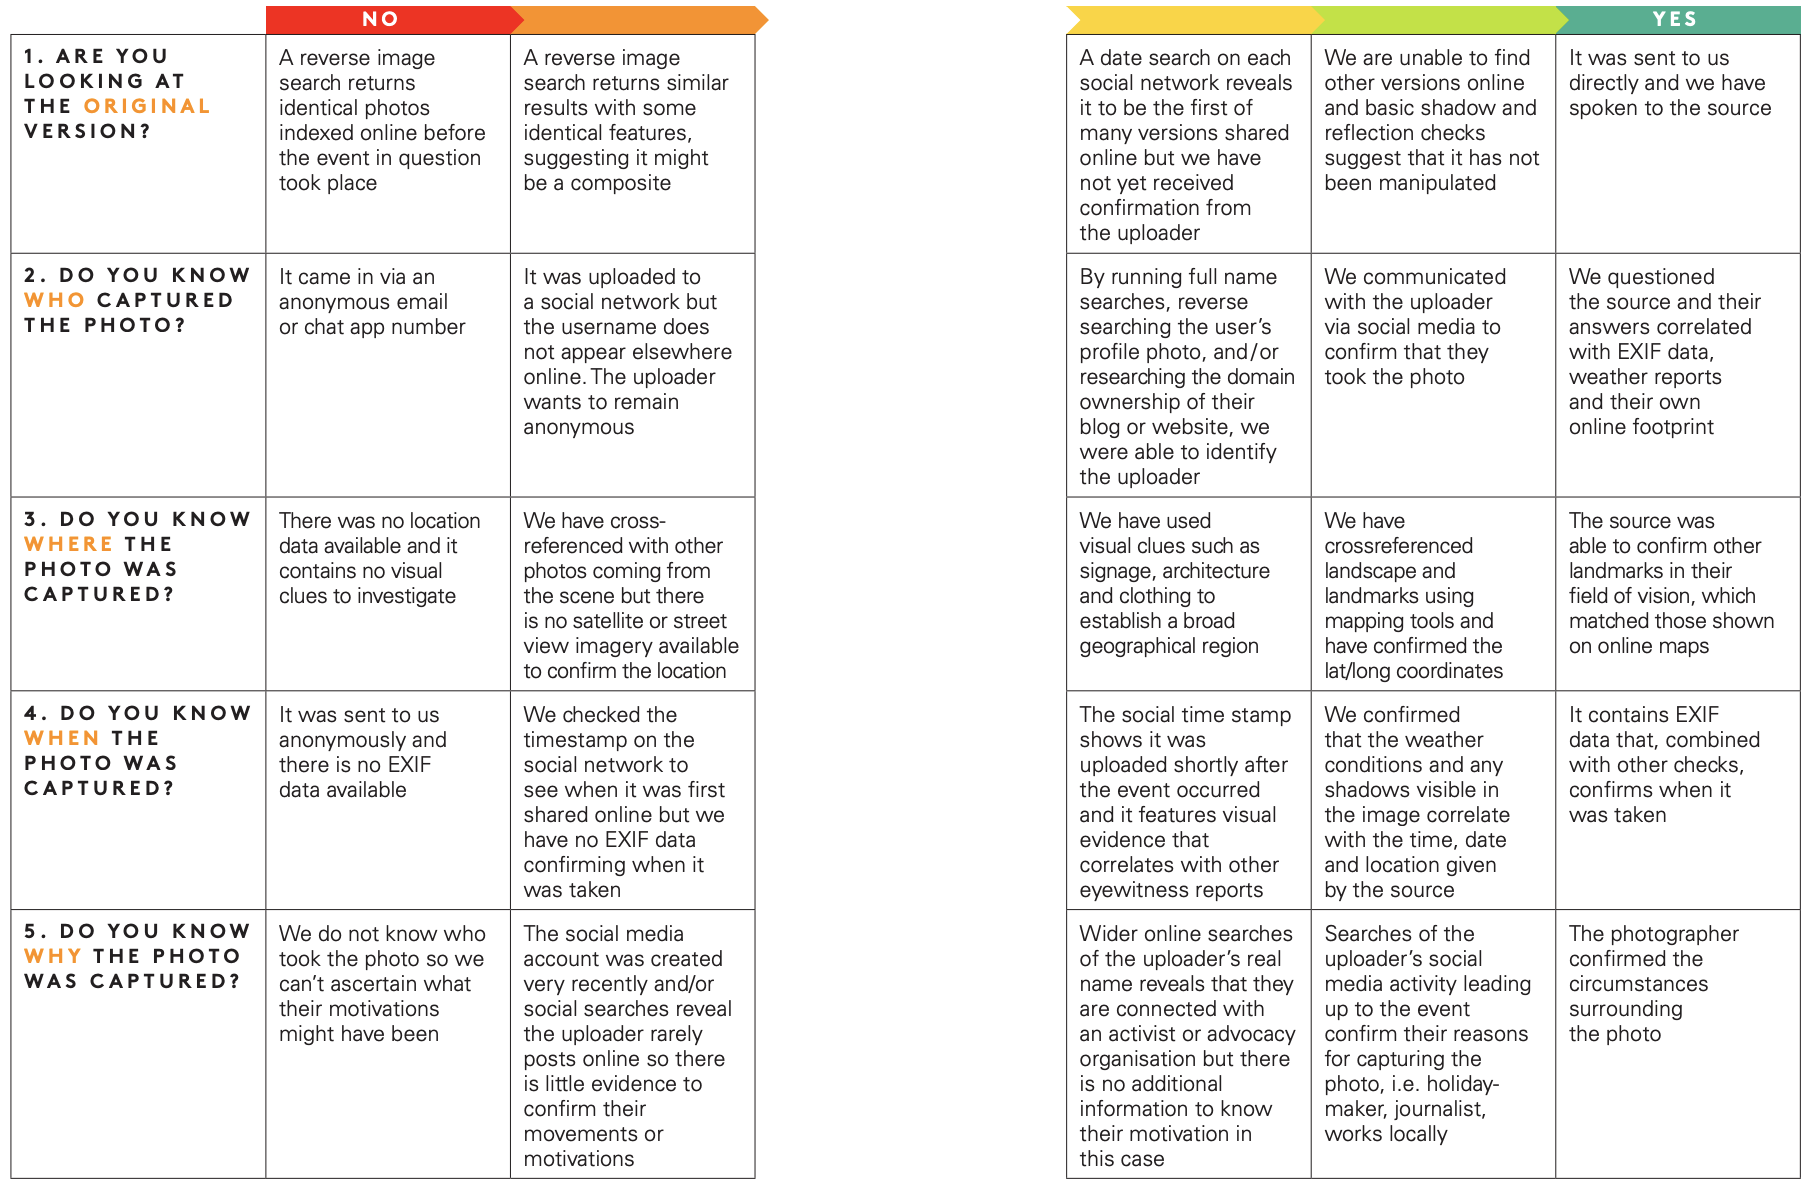
Visual verification guide: photos
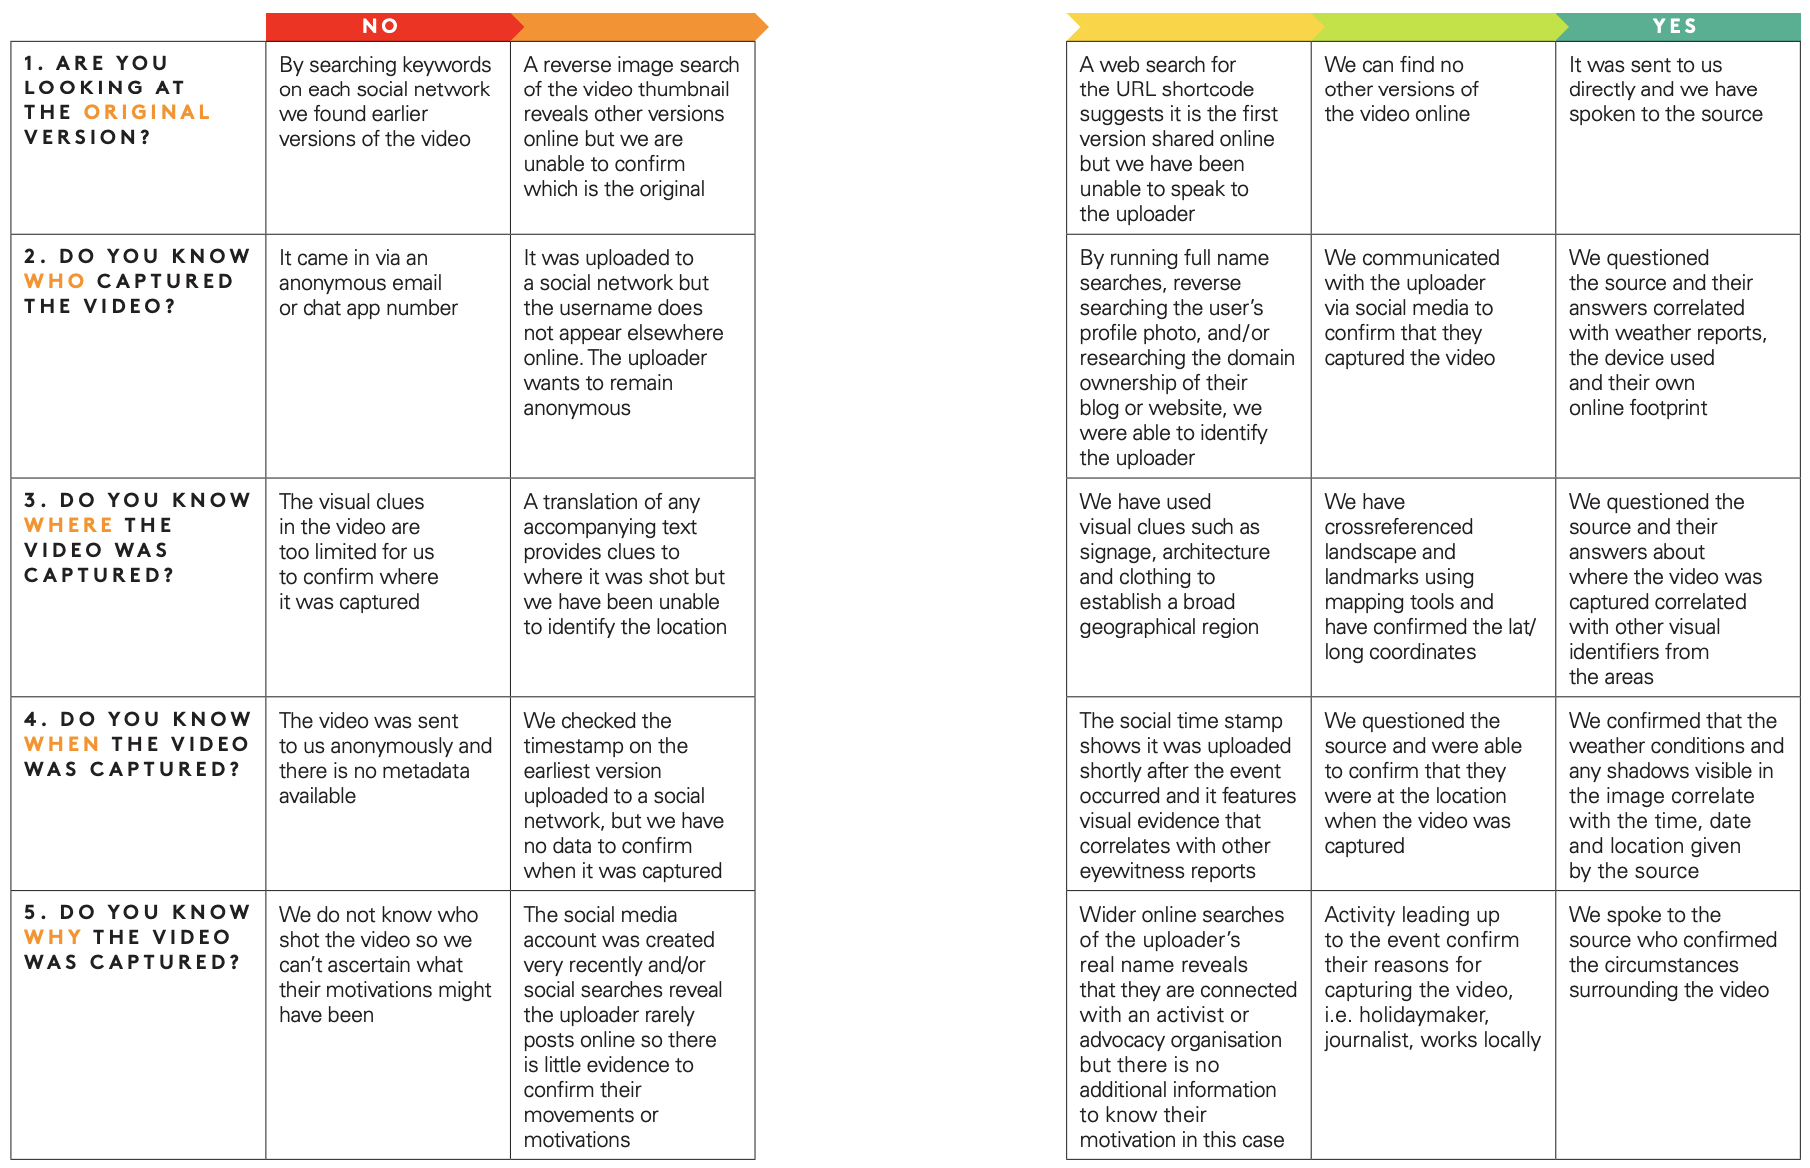
Visual verification guide: videos
Is this worth verifying?
Beware the rabbit hole
Often verification takes minutes. Other times it can lead you down a fruitless path of obsession. Learn to figure out when it makes more sense to give up. Also, be aware that developing too much of an attachment to one hypothesis about where a piece of content came from or whether it is true can not only compromise the integrity of your verification, but also be a big time suck.
We are human and it is easy to have a gut reaction to whether a piece of content is true or false. But we have to remain skeptical at all times.
Remember the old editor’s adage: even if your mom says she loves you, check it out.
The internet is an expansive and cavernous place. If you are looking too intently for a particular piece of evidence, you may miss conflicting evidence along the way.
Understanding spread
Reporting on misinformation is a tricky art. Research shows that even writing “debunks” can, in some circumstances, solidify false rumors in people’s minds. This means that reporting on misinformation, even when well-intentioned, can bring greater exposure to content that might have otherwise faded away.
If you are verifying a piece of misleading content because you want to report on it or write a debunk, consider first what the reach of that content is online.
How many people have seen a false claim already? It is often difficult to quantify with the metrics available, which are usually just shares, likes, retweets, views or comments. But it is important to try. Even small or niche communities can appear more significant online.
If you are looking at a piece of content which has received very low engagement, consider perhaps that it is not worth verifying or writing about.
For more information on this, read First Draft’s Essential Guide to Responsible Reporting in an Age of Information Disorder.
Tips for saving time and frustration
Document it
Screenshot everything! Content can quickly be deleted or taken down by the host platform. You might be surprised how quickly you can lose crucial pieces of information. It is also important for the transparency of your verification.
- You can screenshot on Mac OS by pressing command+shift+5 and then dragging the cursor over the area you want to capture, or by using the snipping tool in Windows.
- It might be helpful to use a screen-grabbing tool like Evernote that allows you to quickly gather bits of evidence.
- Wayback Machine is a browser extension that allows you to save archived versions of webpages.
- Hunch.ly is a very powerful tool that allows you to document an entire investigation by automatically pulling in screenshots of your web browser and cataloging them. It’s a paid tool, so it’s not for everyone, but if you need a reliable system for documenting investigations it might be worth it.
Don’t forget to search
There are a lot of impressive tools out there for verification, and we talk about many of them in this guide. But remember that sometimes a simple Google search will do the trick.
Don’t forget to pick up your phone
In many situations, the best-case scenario is that you find a phone number or email address for a source so that you can contact them directly and ask about the content they shared. Even sending a simple direct message can start a conversation in private, where you can find out so much more than you otherwise would.
Set up a toolbox
If you are going to be doing a lot of verification or other kinds of digital research, it is worth setting up a bookmarking system that lays out all of your favorite sites. As mentioned previously, one of the biggest challenges can be just remembering the tools at your disposal.
Bookmark folders in a web browser are good, but our favorite way of saving verification tools is with a Start.me page. It displays all of your bookmarks nicely and lets you quickly set up and continuously add new resources. You can use it as your homepage or bookmark it somewhere else.
Monitor for related content simultaneously
While you are verifying a piece of content, it can be helpful to have a monitoring dashboard and alerts system set up so that you can see similar content if it surfaces. You can use keywords and language from the content you are examining to set up a search column in TweetDeck, for example, or set up a list of accounts that often engage with your source. For more information about how to monitor social media effectively, see First Draft’s Essential Guide to Newsgathering and Monitoring on the Social Web.
Stay updated
Verification is constantly changing. Tech platforms modify their privacy settings, research tools get taken down and new ones are built. If you want to keep up, you should regularly update your toolbox or read up on the latest techniques from the verification and open source intelligence (OSINT) community. There are many public OSINT/verification lists on Twitter that you can follow to do this. See First Draft’s Essential Guide on Newsgathering and Monitoring for more information on finding and making lists.
Staying safe
There are many safety precautions you should take when diving into digital investigations, but especially if you will be spending time in more closed and anonymous spaces, like Discord. Here are some basics to consider:
- Make sure you have high levels of personal digital security. Use a password manager whenever possible.
- Examine your own digital footprint and the privacy settings on all your social accounts. How much could someone find out about you, your family and friends via your accounts?
- Consider using a VPN and an anonymous web browser like Tor.
If you participate or interact with people in closed and anonymous spaces, be careful about the amount of personal information you divulge.
Ethics and standards still apply
Digital reporting doesn’t mean that basic journalistic ethics and standards go out the window. If anything, there may be new ethical considerations you hadn’t thought about. Here are a few points and questions to dwell on:
- Just as an email is not as good as an interview you did in person, neither is a quote from a post on the internet. Speak to people directly when you can.
- Some verification tools take advantage of the way social media platforms obscure privacy settings and lead people to share things they didn’t realize were public. Avoid needlessly prying into anyone’s private life.
- If you are screenshotting and documenting data from social media, understand that real people are implicated in that data. If your systems are not secure and that data falls into other hands, you can inadvertently put people at risk.
- If you are going to post anything in closed or anonymous spaces during your verification, are you going to use your real name?
- Are you going to be forthright in your purposes for being in those spaces?
For more on ethics and responsible reporting, please see First Draft’s Guide to Responsible Reporting in an Age of Information Disorder and the Ethical Considerations chapter of First Draft’s Guide to Closed Groups, Messaging Apps & Online Apps.
Provenance
What is the original piece of content?
This is the most important check in the verification process and the one you should always run first. Understanding provenance unlocks context and motivation. If you are not looking at the content in the form in which it originally appeared online, you could miss how the same content first appeared in an article years earlier. It may have been part of a running joke on 4chan or emerged as the result of a coordinated campaign in a Facebook group. If you’re not looking at the original, then a lot of the other details— who posted it, when, where, why — could also be incorrect, which compromises the rest of your verification.
Beware!
It is very easy to download content from a website or Twitter, then upload that same content to another social platform. These are called scrapes, and they make it harder to figure out whether you are looking at an original piece of content.
Reverse image searches
A reverse image search is the process of using powerful software to find matching or similar images in a large database, such as Google Images. We use reverse image search a lot in verification, for two main reasons.
- Visual media is compelling, which also means that a lot of the most effective misinformation comes in the form of photos and videos.
- Reverse image searches help us find provenance: the origin of the content, or at the very least, any older versions of the content. If you know there are older versions of an image presented online as new, it is an immediate hint that it may be out of context, repurposed or misleading.
A guide to the tools
Each of the main reverse image search engines is a little bit different. Here’s a brief description of the differences.
Google images
The most useful part of Google’s reverse image search results is down the page, under “Pages that include matching images,” which allows us to see articles that have previously used the photo. Frustratingly, Google does not allow us to order our search results by date, but it does allow us to select a custom date range to narrow results. Go to images.google.com, press the camera icon in the search box and upload a picture.
Yandex
Russian search engine Yandex has a large database and some extra functions Google does not, like finding faces or images that have been flipped. If you don’t find something on Google, give Yandex a try.
TinEye
The benefit of TinEye is that the platform lets you easily organize your search results by date. This means you can quickly see the first recorded instance of a photograph online, which gets you closer to understanding the provenance. The downside is that the engine has a much smaller database of photos online, so if you are looking for something that is more obscure, they might not have it.
Our #1 recommended tool: The RevEye Reverse Image Search Extension (Chrome or Firefox).
The RevEye browser extension allows you to right-click on a photo and immediately perform a search on any of the aforementioned platforms and more, or all of them at once.
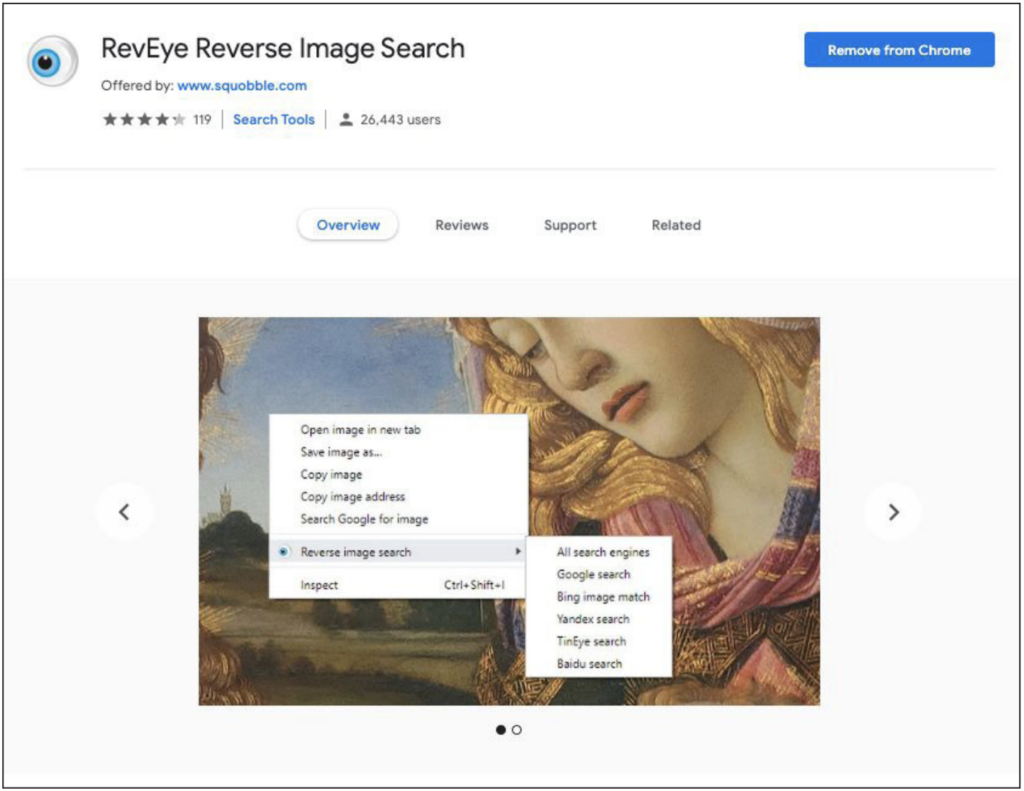
RevEye Reverse Image Search, as available on the Chrome web store. Retrieved September 7, 2019. Screenshot by author.
Video verification and using InVid
Finding the provenance of videos is similar to photo verification. Often the first frame of a video is used as the “thumbnail” image of a video — the preview picture before the video plays — so it is a useful place to start when searching. Take a screenshot of a frame from the video and perform a reverse image search on it in exactly the same way as any other image.
One of the most powerful tools for verifying videos is the InVID Verification Plugin, which you use via a Chrome or Firefox browser extension. Here are some of its capabilities:
- It makes investigating provenance easy by breaking down any video from social media into thumbnails and then allowing you to do a reverse image search on any of them with a click.
- It shows you basic data associated with the video: upload date and time information, information about the user account, shares and likes and any associated text.
- It uses natural language processing to pick out any verification-related comments on the video — in other words, any comments that might provide clues as to whether the video is original, misleading or out of context.
- It has a magnifying glass tool that lets you quickly inspect small text in a photo or video — an identification number on the side of a plane, for example.
Check anonymous spaces for earlier versions
Misinformation, memes and other kinds of user-generated content on the social web often originate in more closed and anonymous spaces. If you are trying to find the first version of a meme or suspicious claim, it is sometimes worth searching in these spaces.
- Check Reddit: You can use the native search bar.
- 4chansearch.com allows you to search 4chan and 4chan archive sites
- Gab.ai is like an alt-Twitter platform where many users who have been suspended have migrated.
- Discord channels, Facebook groups and WhatsApp groups are more difficult to find and search but may be worth the effort for deeper dives.
Source
Who captured the original piece of content? When we talk about verifying a source, we distinguish between who posted a piece of content and who captured it. The primary source is who captured it. It is entirely possible, for instance, that somebody in Cairo recorded an eyewitness video on their phone, sent it to their friend in Paris and the friend posted the video on Twitter. But the primary source is the eyewitness in Cairo. They are, ideally, the individual we want to identify. Identifying primary sources can be difficult, but worthwhile for stronger verification. This chapter will walk you through some tips and questions on how to do it.
Basic questions to ask about sources
- Who is the uploader?
- Look at other content they uploaded: What does it tell you about the account?
- Is it possible they uploaded this content but didn’t create it?
- Does it make sense that the person who holds
the account was near the location when the event took place? - Can you find any contact information? Look for a phone number or email so you can speak to them directly. You want to speak to the source before making any claims about their identity.
Tips for investigating sources
Many people leave behind hefty digital footprints and it’s amazing what you can learn by connecting the dots between their different social accounts.
Here are a few tips:
- Look at their account username and see if you can find other account names that are the same.
- Do a reverse image search on their account pictures.
- Search for language from the content to see if there are other accounts that are posting the exact same material.
- If you find any contact information associated with the account, pop it into a search bar and see if it connects you to other social media accounts.
- You can put an email into Skype and it will pull up any users associated with that email.
- Look for the source on LinkedIn to see if you can find helpful identifying information.
- Many posts on social networks have a unique identifier, usually found at the end of the URL.
You can copy that identifier and paste it into Google to see where else the content has been embedded. - Look for a website that is associated with the
social media account, and search for any identifying information there.
Is this account automated?
There is a lot of discussion around bots these days and there are many tools that attempt to identify whether social accounts are automated (for example, Hoaxy or BotSentinel). But beware: Bot forensics is an imprecise science.
Here’s what you need to know:
- Many tools use 50 tweets a day as a measure for predicting whether an account is automated. But plenty of accounts that aren’t automated at all easily exceed this number.
- What is important is not understanding whether an account is automated, but whether the account is consistently spreading misinformation online — human or not.
- “Cyborgs,” for example, are people who exhibit bot-like behavior, such as posting frequently and consistently throughout the day. Some cyborgs are paid to do this work. Others are keen supporters of a policy position or political candidate and see online amplification as a role they can play to support the cause.
- If you are still interested in understanding whether an account is automated, a better measure might be tweet activity throughout the day. Most people need to sleep, so their activity should show a period of silence to reflect that. It’s still not a perfect measure, because tweets can easily be scheduled to appear only during waking hours.
Using Twitonomy to understand Twitter accounts
Twitonomy is a great tool we use for investigating Twitter accounts. Here are some interesting questions about accounts that Twitonomy can help you answer:
- When did they join and what does their tweet history look like over time?
- What is their average tweet count per day?
- What percentage of their tweets are retweeted?
- Which users do they retweet the most?
- Which users do they reply to the most?
- What are their most-used hashtags?
Investigating domains
Sometimes you will want to investigate the ownership of a particular website. There are many sites that help you do this, but viewDNS.info is a favorite. It allows you to do basic searches for domains and IP addresses, but also includes other searches, including historical IP addresses for a domain and IP location finders.
Here are some quick tips when you are looking at domains:
- If you are questioning the authenticity of a site, look for suspicious URL endings.
- If the registrant has paid to hide the registration information of a domain, look for old versions of the site. Sometimes a site will migrate and the registrant will pay to protect the new site, but forget about it on the old. You can look for variations of the URL such as .net or .info, or you can pop the domain into Google and see if anything related comes up. Note that this information is automatically protected by the GDPR legislation in Europe.
- You can do reverse IP searches to look at other sites that are hosted on the same server. These sites are not necessarily related, but the results can be revealing.
Tools to invest in
Many tools we previously used to investigate social media handles have been shut down because of legitimate concerns about privacy. However, there are still some very good tools available for a fee that you might consider investing in, like Spokeo and Pipl. These directories are especially helpful for finding contact information.
Date
When was the content captured? Every social media post has a timestamp, but timestamps only tell you when a piece of content was uploaded, not when it was captured. Stronger verification will identify when a piece of content is captured. Now that smartphones are so ubiquitous it often happens that people are uploading content as soon as they capture it, but you can’t assume that this is the case. Users can also take other people’s content and repost it days or years after it was first uploaded. This chapter will walk you through some tips for getting closer to identifying the time of capture.
A guide to social media timestamps
All of the platforms have different ways of displaying dates and times. Below is a handy reference.

Exif data
Another useful method for finding the time or date a
piece of content was captured is by looking at the metadata in the file.
Every image we capture on a digital camera contains extra information in the image file, such as time, date, camera settings, device information and even coordinates, if the device has GPS turned on. This is called its Exif data (Exchangeable image file format).
A great free tool for viewing a file’s Exif data is Jeffrey’s Exif viewer 20. Simply upload an image file and it will show you the extra information stored. But be warned: Almost all social media platforms remove Exif data when a user uploads an image, so you will need an original file for this to work. When verifying eyewitness content, ask the uploader to email you the original image file in order to complete this check.
This is worthwhile if you are suspicious about images or files someone has posted — and it works for dozens of different file types. It is possible to fake or alter a file’s metadata, but only the most sophisticated fraudsters will attempt this.
Pro tips and tools for verifying dates
- The InVID Verification plugin allows you to see the upload times for social videos in UTC.
- SunCalc allows you to see the angle of the sun on a particular day in a particular place, which can help you determine what time of day something in a photo or video happened.
- Wolfram Alpha is a computational knowledge engine that, among other things, allows you to check the weather from a particular date. Type in a phrase such as “What was the weather in Omaha on November 5, 2017” to get a result.
- Always remember to look for provenance first. Do a reverse image search if you are looking at visual media to see if there are older versions of the content.
Location
Where was the content captured? Social media posts are often geotagged with a location, but this is not necessarily the same as the location where the content was captured. Geotags can be wrong, content can be saved and then uploaded elsewhere, and social media users thousands of miles away can take other people’s content and post it as if it were their own. This chapter will help you verify where the original content was captured.
Basic questions to ask about location
- Where is the account associated with the content based?
- Do they tag the location in their content?
- If there is a location identified, does it make sense that the account holder was there?
- Did they make note of their location in other posts?
Location searches on the platforms
It used to be very easy to search by location within platforms, but because of evolving privacy concerns a lot of these functions were removed. There are some third-party tools that still allow you to do these searches. For example, the whopostedwhat Instagram search tool lets you search for posts tagged with a particular date in a particular location. Many of these third-party tools come and go, so it is best to build your own toolbox and stay abreast of changes and updates.
Don’t be fooled! Geotags can trick you
Sometimes you can see a geographic location tied to a particular tweet or Facebook post, but this information can be easily manipulated. Metadata can also be manipulated.
Always independently verify location
If you are looking at an image or video, find the location on a map or satellite image for cross-reference.
Even satellite imagery can be flawed
Geolocation is always more difficult when the relevant satellite imagery is out of date. Some newsworthy events, such as extreme weather or war, can dramatically alter the landscape in a matter of minutes. This has made geolocation of videos challenging in countries such as Syria, or after hurricanes.
Flex your observation muscles
The most important skill to develop for verifying a location is the skill of observation. It is amazing what you can geolocate if you pay attention to the details in photos and videos.
Here are some questions to get your mind going:
- Are there unique geographic features? Major roads? Large grassy fields? Mountains?
- Are there unique buildings that would be easy to spot in satellite imagery?
- Search for telephone numbers, license plates, business titles and the writing on banners and signs.
- Interrogate the context: Are there any events and circumstances in the content that might show up in news articles?
- Notice weather, foliage and clothing — does it make sense for the location?
Cross-referencing with satellite view and street view
Here are a few tools you should be aware of when you are independently verifying location:
- You can search for shop names and look at locations in satellite view on Google Maps.
- Google Earth goes further and allows you to look at historical satellite data.
- If you are really getting into satellite imagery, it can be useful to look at different search engines, which will provide data from different times. Bing and Yandex are two other options. Yandex provides more data about Eastern Europe.
- Wikimapia is an interesting tool that allows the community to describe features on the map.
Often geolocation will involve identifying a number of different features in a picture or video that help us triangulate where it was captured.
The area code of a telephone number on a billboard is a good start, but when combined with a cell tower on a hill in the background and a uniquely shaped and colored roof in the foreground, we stand a much better chance of finding the location.
Motivation
Why was the content captured or posted?
This chapter is the shortest, because it is nearly impossible to verify why someone captured and shared a piece of content. The closest you can come is asking them, and sometimes even that will not yield the truth. But understanding motivation, or at least having some sense of it, can be very helpful for the rest of your verification process.
Here are some basic questions to ask about motivation:
• For photos and videos, was the person who captured the content an accidental eyewitness?
• Does the person’s profile or social media use suggest they are an activist or agitator?
• Did the person attend an event to capture it from a particular perspective?
• Is the person affiliated with a government, corporation or research organization?
• Is the person a member of online communities that support or promote a specific cause?
A reminder about maintaining rigorous standards
Remember that a quote or explanation posted on the web is not as reliable as a direct interview with a source. When possible and safe, reach out to the person who captured the content directly.
First Draft’s favourite tools
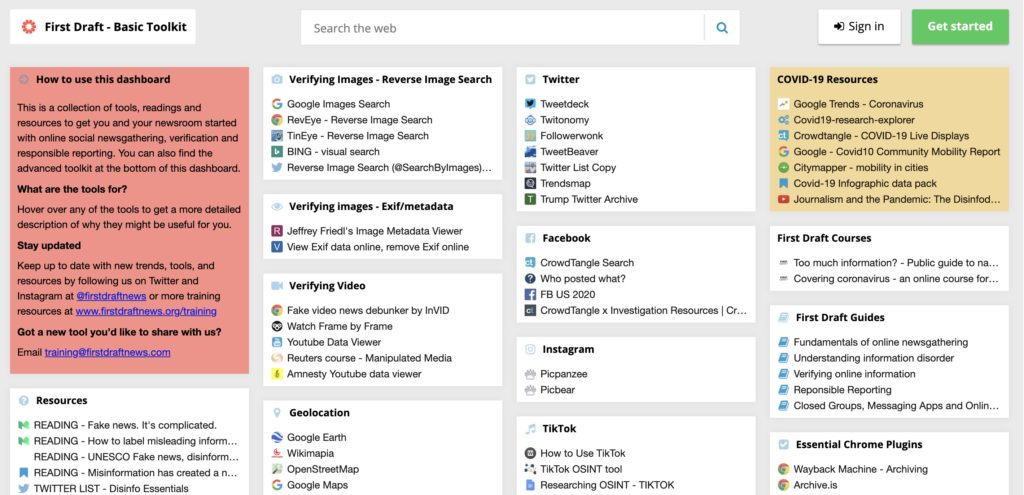
First Draft Toolkit displaying our most commonly used verification tools. Retrieved March 1, 2020. Screenshot by author.
This article is the most up-to-date version of the Essential Guide. Click here to download a PDF version of this guide. Last updated October 2019.
About the author
Shaydanay Urbani is First Draft’s partnerships and programs manager in New York, where she covers disinformation and trains journalists internationally in verification and responsible reporting. She has a background in criminal justice reporting, Middle Eastern languages and politics, and food policy. She received her BA from the University of California, Los Angeles and her MA from the Craig Newmark Graduate School of Journalism at CUNY in New York.